


Jan 29, 2024
10 | The Ever-looming Threat of Deadlines Will Not Defeat Me
- Izzy Foo
- May 2, 2024
- 5 min read

Updated: May 8, 2024
As I write this, I have 10 days to finish this project. That includes uploading this entry – which will probably be my last (yes, you read correctly, you are almost free).
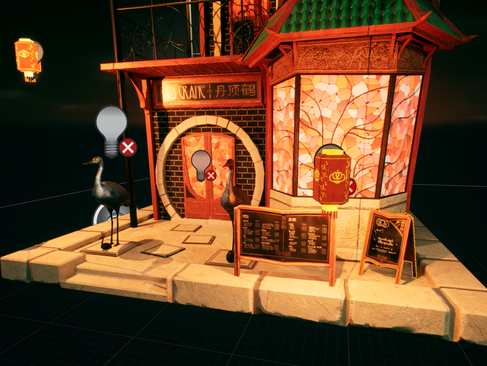
There were still a couple of things to do on my building, and I went systematically down the list. First up was adding a post processing unit to my Unreal scene, which I tweaked to push some of the shadows into the green range, instead of the previously monochromatic warm colours in both light and shadow, along with adding some film grain and messing about a bit with some other settings. I don’t remember exactly what I did but here is the before and after:


Some of my geometry was too simple, such as the floor piece the restaurant rests on, and the roof. Back in Maya I updated some of this to help it look less low-poly.

Adding movement through the material editor is something I attempted for my lanterns, inputting time data into a sin wave on an isolated z-axis.
Disclaimer! I did not come up with this on my own - I am not knowledgeable enough to do that yet, only enough to understand it.
This worked wonderfully in terms of getting the lanterns to move, and I made multiple instances moving at different speeds so they would offset from one another. The problem with this though, is that the lanterns would flicker on and off, as if glitching, whenever the camera moved or if it got too close. No one knew what was wrong or how to fix it so, unfortunately, I had to give up on that method for animating the lanterns.

The sequencer was how I solved that problem, after creating my first pass at camera shots. I created a Master Sequencer (with 0 intent to create other sequencers, but I am aware of the workflow where you create a new sequencer for each shot and then add them into your master sequencer at the end) and imported my camera actors. This allowed me to animate camera movement using keyframes. I am familiar with keyframe animation from personal animation I have done for fun, so the sequencer and its layout felt familiar, and I was able to go about moving my cameras. I prepared around 5/6 shots to try and show off different aspects of my building. These were messy and the animation curves needed adjusting, but I would do that later.
Animating the Lanterns in the sequencer was the same sort of deal, import the actors, and then add keyframes with movement. I kept the material instances I had previously used to create offset and had keyframes of different spacings and displacements for each instance, this effectively created 4 different speeds I could choose to have my lanterns move at. V=D/t, so the maximum velocity of a lantern would be by taking the maximum displacement value, and the minimum time value.
!Unreal Moment Interjection!
Okay so I made part progress on animating the lanterns on one computer, closed it, pushed the files onto the repository, and went to sleep. Then it’s the next day. I open it up on a new computer, having fetched and pulled the changes, and everything is see-through?????? No idea what happened, neither did anyone else, so I ended up reverting that last commit and re-doing the work. Not an issue really but like what? Happened?

To create further individuality, I offset the keyframes along the timeline to change the starting point of the animation. I was able to do this because each lantern had its own set of keyframes, which is possibly not the most efficient way to animate, but it works, and I do not want to do it over again so that’s that.
At this point I technically have enough for the hand-in, I have a cinematic that is 1min30s long, a shop, and a hero asset to take renders of, and a blog that is over 2500works (so sorry). This is my safety net if everything goes wrong. (ignoring the face I still have to place all my modular pieces into an unreal scene)
Everything now is final improvements; I spoke to some of my lecturers and here are some things they made note of:
-Environment the shop is placed in
-Breaking up uniformity of textures by adding decals/foliage/roughness
-Expanding on the texturing of my hero asset
-Adding more light to reveal my detail in my scene
-Direction of wood grain on prop items
-Possible second hero asset with substance sampler textures
Out of these I do not believe I will be able to do them all, so I will be prioritising lighting, wood grain, and the environment alongside fixing my camera shots. My second level of triage will be hero asset texture and foliage made in sampler, and only if that is all done and I have time, will I create a better hero asset. I would also like to have everything finished the day before, so that only leaves 9 days. Having 3 days for each section as a maximum sounds reasonable to me right now.
The rubric does not say we are creating a game-ready asset, so technically optimisation is something we should be trying to do, but not essential/graded for this and more for when we do make game ready assets in future. However, I had thought about my atrocious light detail map, and decided I wanted to improve that. Even though I am not making game ready assets right now I will be in the future so learning how to do this properly to improve performance will be very helpful. I think you should look at my texture density map instead hm. Yes look. So green.


(left to right: pre-baking light optimisation, post-baking optimisation, texture density)
Unreal has 3 types of light; static, stationary, and moveable.
A moveable light is rendered in real time, it is constantly updating and calculating the positions of objects it interacts with in order to create dynamic shadows. If you walked in front of one of these, you would cast a shadow.
A static light is the opposite, it is baked into lightmaps which add to your textures - effectively painting the light as you would on a canvas (the analogy I like to use). These will not cast shadows if you move past them, but are very cheap to use so are amazing for bringing light to detail in your scene.
A stationary light is something in the middle, it is baked light but will still calculate shadows for moveable objects. A static light will convert to a stationary light after being moved until baked again.
I had a lot of stationary lights that would be better off as static lights, so I was like hell yeah time to do some baking lemme get my apron.
The point lights that were helping the lanterns glow illuminating the door/windows, and providing rim light to my cranes I set to static, and went to build my lighting. I was so excited for my new light efficiency. It finished baking and everything went dark?
Baking my point lights just turned them off? Confused, I set them all back to stationary and tried again to no avail. Was I doing something wrong? Did my total and complete lack of googling how to bake lighting affect this? Probably. Have I since googled how to bake light in UE5? Absolutely not lmao.
As I said before this is not required to be a game ready asset therefore this means nothing :)


Comments